Brigadeiros, a Brazilian treat with a taste of history

Image

When I think about Brazil my heart always warms up. Not only because one of my best friends is from that beautiful part of South America, but also because of the richness of its culinary world and culture.

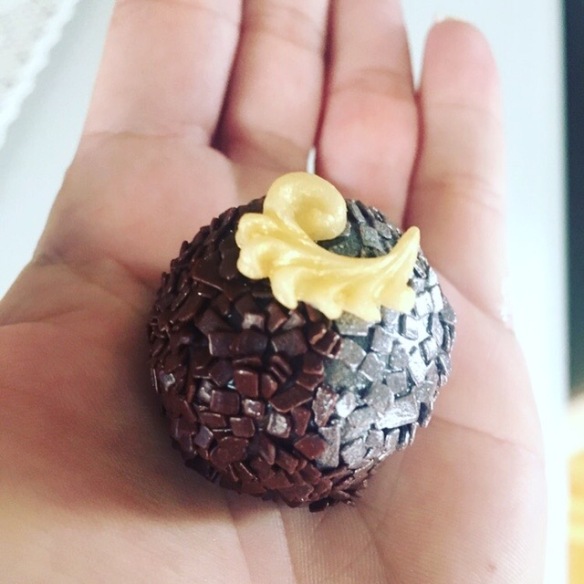
The first time  that I tasted a brigadeiro I fall in love with them! For those who never had this sweet experience yet, let me give you an introduction. Brigadeiro is a chocolate truffle-like bon-bon that was named after Brigadeiro Eduardo Gomez, a Brazilian air force leader who ran for president several times during the 1940s. During his campaign, history says that Brazilian women raised money for Gómez by selling sweet chocolate balls made with condensed milk as a base, calling them “brigadeiros” for short. Though Gómez did not win the election, this amazing sweet treat remains a staple at Brazilian birthday parties and  gatherings. They are incredible rich in flavor and can be eaten straight up or used as a topping on other pastries or cakes.

That being said, brigadeiros make up a big part of the Brazilian culture and is considered a national icon. They are generally made in Brazilian homes and it can be eaten with spoon straight from the pot, which is why it can sometimes be called “brigadeiro de colher” (spoon brigadeiro). Traditional ones are shaped into small balls covered in chocolate sprinkles and placed in a small cupcake mold. This dessert is normally served to children at birthday parties and is eaten after the birthday cake. The brigadeiro may also be served in different reunions, especially when friends get together. It has a sentimental value to most Brazilians.

Flavors like amaretto, mocha coffee, coconut, passion fruit, lemon, banana, pistachio, nuit, almond, doce de leite (caramel), marzipan, prestigio (chocolate filling with coconut), zabaglione, Grana Padano cheese and guava paste, and much more!

Today, we celebrate Brazil for its warm heart, reach culture and sweet bridageiros. Here is a simple recipe for you to try, taste and see. Have fun and enjoy them. The only risk is that you will not be able to stop eating them!

Chocolate brigadeiros:

Ingredients


  • 1 tablespoon (14.79 mL) butter
  • One 14-ounce can condensed milk
  • 3 tablespoons (44.37 ml) cocoa powder or Nesquick powder (American cocoa powder is a little bit less sweet)*
  • Chocolate sprinkles

Directions

In a medium saucepan over medium-low heat, melt the butter. Add the condensed milk and cocoa powder. Stir well with a spoon until your butter is melted and everything looks thoroughly mixed.  Continuously stir your chocolate until it’s thick and you can clearly see the bottom of the pan when stirring. Use a large wooden spoon to do this. Don’t stop stirring for the entire time your mixture is on the stove top. As your mixture heats, it will gradually thicken. In about 10 to 15 minutes, it should be done. When it seems thick enough, turn off your stovetop. The consistency should be firm and should hold together. Pour it into a dish and let cool to room temperature, about 15-20 minutes. If you are not planning to make the brigadeiros the same day, you can keep it in the fridge for up to 3 days or in the freezer.

Once you think it’s cool enough, test a section by trying to roll it into a ball. It should hold its shape. Lightly grease your hands with butter and roll about a teaspoon of brigadiero between your palms to form 1 1/2-inch balls.

Roll them in your favorite chocolate sprinkles and place them into small paper cups.

You can always change the toppings for shredded coconut, crushed nuts like pistachio, walnuts, crystal sugar, etc. The possibilities are endless. Be creative, have fun and share with family and friends to celebrate the Brazilian cheerful and warm spirit.


chocolate brigadeiro


Argentinian flavors in a bite

For all those who have requested many times my recipe for the Argentinian empanadas” (Argentinian style meat turnovers), here you have it. Now you can try to make them at home and share with family and friends at all times. They are the perfect food to make, bake, freeze and store in individuals packets and have them ready to go. Take them to the office for lunch (you will make new friends I promise you), get them ready for your kids so they can have a healthy snack when they come back from school or hide them for yourself in the fridge (good luck with that!). You can enjoy them either hot or cold. They are so easy to make that you are not going to believe it!. Once you have conquered this recipe nobody can stop you from making your own creations by replacing the meat filling with anything you like (try ham & cheese; tomato, mozzarella and ham; spinach & ricotta; cooked tuna, and much more)

You can either try to make the crust or use frozen pastry dough sold at your grocery store. If you go for the second option, allow the dough to defrost in the fridge overnight before using it.

For those who like to challenge themselves in the kitchen and have more time to spare, here goes my recipe for the empanada crust. Notice that this recipe is best for baked empanadas instead of the fried ones. If you ask me wich one I prefer or like most, the crust for baked empanadas is the answer as it is a healthier choice and stores better.

Crust for baked empanadas:

Ingredients

  • 1 2/3 cup all-purpose flour
  • 1 cup of Salmuera (brine). Prepare a concoction with dissolved salt in hot water and left aside until cold.
  • 4 ounces of butter or margarine

Preparation
To make the crust, place the flour into a bowl and mix the margarine or butter into the flour using your fingers. Pour the Salmuera slowly into the mix and mix it with your fingers just until the dough comes together and can be formed easily into a ball. Let the dough rest (outside the fridge) for about half an hour. Divide the dough in small balls the size of half an egg. Then roll with a roller pin out to a thickness of 1/8-inch making a rounded shape.

Filling:

  • 1 pound ground beef
  • 2 tablespoons Corm oil
  • 1 tablespoons of butter
  • 1 large yellow onion chopped in small squares
  • 2 hard-boiled eggs, finely chopped
  • 1/2 cup green olives, finely chopped
  • 2 tablespoons raisins
  • ¼ cup chopped spring green onion (only the green part)
  • 1 tablespoon ground hot and sweet paprika
  • 1 tablespoon ground red dry spicy peppers
  • 1 tablespoon cumin
  • Salt and freshly ground black pepper to taste

Preparation

In a large saucepan, melt the butter with corn oil together, and place the onions and stir them until transparent. Add the ground beef, next add the raisin, spices, salt and fresh ground black pepper to taste and stir with a wooden spoon to keep the meat broken-up. Pour over about a half cup of water and let it cook for about 10 minutes or until meat is completely cooked. Once cooked, place the filling in a bowl, let it cool off, cover it and put in the refrigerator (for better taste) overnight, otherwise if time does not permit, leave the filling for about an hour in the refrigerator. Once you have the mix cold then is when you add the hard-boiled eggs, green olives and spring green onions.

Egg wash:

  • 1 egg, beaten
  • 1 tablespoon milk or water

Filling the empanadas:

Take the dough you let to rest and divide the dough in small balls the size of half an egg. Then roll it out with a roller pin to a thickness of 1/8-inch making a rounded shape from each ball. Spoon the filling onto one half of each leaving room to fold in the other half and seal. Tab some warm water with your fingers, place in half of the ends so the dough will stick better, press the edges with the tip of a fork or you can do what we call in Argentina “repulgue” which instead of using the fork to seal you flip it upwards and press with your fingers. Place on a non-stick baking pan or add a thin layer of butter to the pan. Combine the ingredients for the egg wash and brush each empanada at the top. Pre heat the oven to 350 F and bake them until the crust turns light brown. Buen provecho y a disfrutar!

Do not be intimidated by doing the “repulgue”. Keep trying and remember that with good practice you will become a pro! You also have the option of closing and pressing the dough with the help of a fork

Time for me to make a visit to the kitchen and look for these delicious snacks in my freezer… so much working deserves a good prize! Yummy!


A recipe for success: “Paella”

I dedicate this post to one of my favorite dish to eat, while in Spain, or to cook at home: paella. When it is made properly, you have a recipe for success that can be enjoyed for everyone. You can adapt the basic recipe according to your food preferences: add seafood for a “seafood paella”; add chicken, pork or rabbit (like they do in Valencia, Spain) to the seafood and you have “mixed paella”; add just vegetables and it will be a delightful dish suitable for all vegetarians. As I said before, you can not got wrong with it!

To my opinion, there is not better dish that brings together the fruits of Spain’s rich soil like: rice, fresh vegetables, plump chickens, rabbits, pork, abundance in seafood and shellfish with the use of the distinctive olive oil, than paella.

It is essential to choose the correct utensils and the freshest ingredients to make paella. You will need a special pan that it is different from the regular frying pan that you probably have in your kitchen. These pans called “paelleras” have a special low border about 1 1/5 inches deep and has dips in the central part like a golf ball and two rather large handles on each side. There are paella pans measuring from 7 inches to 1 yard wide and for special occasions for hundreds of people to eat from. When considering  to buy your pan, choosing the right size is very important. Knowing how many people will be eating the paella will help you to choose the right size. Normally, a 13” pan serves 6 people; a 15” pan serves 8 people; a 17″ pan serves 10 people and a 22″ pan serves 16 people.

The traditional, authentic paella is still made nowadays over an open barbecue with kindling wood which, although does not seem to be so important, adds to the correct cooking of the paella.

Before you start preparing paella, it is best to check if you have all the ingredients and the equipment that you will need. Pay attention to the following list:

Equipment:

  • 17 inch (144cm) paella pan
  • Round charcoal BBQ
  • Medium sauce pan
  • Sharp knife for chopping meat and vegetables
  • Meat cleaver (if you use a whole chicken)
  • Aluminum Foil or Large Tea Towel to Cover Paella

Ingredients:

  • 1 yellow onion, diced
  • 2 medium tomatoes, diced
  • 1 whole chicken or 8 chicken drumsticks
  • 1 1/2 lbs pork loin (fat trimmed), cut into ¾ inch pieces
  • 1/2 lb calamar (squid) cleaned and sliced into rings
  • 3-4 cups of medium grain or “pearl” rice* (The exact quantity of rice will depend on the size of the pan, so have at least 1 lb of rice on hand)
  • 4-6 cups chicken broth
  • 1 large pinch Saffron
  • 1 1/2 lbs raw mussels in shell (frozen or fresh)
  • 1 lb small clams (frozen or fresh)
  • 1 1/2 lbs raw shrimp, medium or large – shell on
  • 1 red pepper seeded and sliced
  • 1 10 oz. bag frozen peas
  • Olive Oil, Salt to Taste
Procedure:

Cut the Chicken and Pork into Serving-Size Pieces – You’ll need one whole chicken, cut into serving-size pieces or 8 chicken drumsticks. If you use a whole chicken, use a meat cleaver to cut the chicken into pieces small enough to easily mix while sautéing.

With a sharp knife, cut the pork into 3/4″ pieces.

Clean the squid and remove the tentacles. Make sure to remove the innards and the “spine” and discard. Then, cut the squid into rings.

Important: Try to buy fresh squid whenever possible. If fresh squid is not available, look for packages of squid in the frozen food section. The squid should NOT have batter or coating on them, since that type is used for frying.

Slice red pepper and chop onions and tomatoes, set aside.

Now that you have the ingredients cleaned and chopped, it’s time to start the BBQ and begin cooking. When the coals on the BBQ are covered in white ash, cooking can begin.

Assemble all the ingredients on a table near the BBQ, so that you can stay in the area and monitor the cooking.

Place the paella pan on the grate and add enough olive oil to coat the bottom and allow the pan to heat up. When hot enough, sauté the onions and tomatoes in the olive oil. Add olive oil as needed to prevent sticking. Once the onions are translucent, add the chicken and cook, stirring constantly – about 15 minutes. Add pork and squid and cook, stirring often.

Add the rice, sprinkling in the form of a large cross on the pan. (Have approximately 1 lb of rice on hand for this.) Stir for 2-3 minutes to thoroughly coat the rice with oil and mix with the other ingredients.

Add saffron threads to the chicken broth and stir. Slowly pour broth into pan until pan contents are covered. Spread ingredients evenly over bottom of pan.

Arrange mussels around outside edge of pan, pointing up. Place clams and shrimp in pan, distributing them evenly around the pan. Add slices of pepper on top.

Allow to simmer and add more broth if necessary. (If fire becomes too hot, raise the pan up, away from the heat.). Add the frozen peas at the end when the rice is almost cooked.

When the rice is ready remove from heat and cover with aluminum foil or large tea towel, allowing paella to “rest” for 5 to 10 minutes before serving. If rice has been cooked properly, the rice grains should be loose, not clumped together or with mushy texture.

For an extra touch to your dish, arranged small wedges of lemon and fresh aromatic herbs like rosemary, then serve and enjoy the goodness of a Spanish Paella!

If after reading this recipe you are still not quite convinced in making some at home, just take a look at these pictures. I guarantee you will be gathering all the ingredients and cooking in no time or buying the next flight ticket to Spain.

early stage of the cooking process of the paella

Almost ready to be served and enjoyed …

Let’s eat!

Fideua: is other version of the traditional recipe made with short angel hair pasta (cabellos cortos) instead of rice. Very popular dish in Barcelona

If you are visiting Barcelona a must place to enjoy paella, fideua and black rice is “El Xiringuito de Escribá”. You will be delighted by the food, the service and by the amazing location by the beach

“Black rice”

restaurant: “El Xiringuito de Escribá” in Barcelona

Celebrating Italian flavors: from the fields to your table

Every season brings its harvest of fresh and appealing vegetables and fruits. There is no greater satisfaction than to prepare them in a healthy meal for your friends and family. As a good doctor will tell you, vegetables and fruits are a great source of minerals, vitamins and fiber. All good check outs for a healthy diet! At the time of choosing your vegetables, you might consider growing your own at the convenience of your own garden, or buying them at your local supermarket or farm market. Nothing can beat the fact of getting fresh vegetables and fruits from the fields to your table. It is almost as good as having your own garden!

When buying vegetables and fruits, quality and freshness are crucial. They should be firm to touch, with good color, no withered or yellowing leaves. So, next time you visit your local farm markets examine your vegetables and fruits closely. Smell them, touch them, and learn how to know how they should look like in order to taste good. Choosing the right ingredients with the best quality and freshness are the key for any successful meal.

Now that you had successfully completed “Vegetables and Fruits 101”, get your apron, your chef’s knife and be ready to make them shine in a healthy and simple meal. Remember, when you choose the right ingredients, you are on your way to a great meal. Let your food speak for itself.  There are few ways you can show off your fresh produce. Take advantage of the sunshine and your grill before cold weather comes. Cooking vegetables and grilling fresh fruits in a grill pan or over a barbecue enhances their natural flavors. Serve them with a drizzle of good Italian olive oil; finely chopped herbs (like parsley, garlic, basil, etc); pair them with fresh crostini or your favorite bread and you have fixed a quick, simple and healthy meal.  For dessert, grille some fresh peaches, plums, apricots, drizzle them with lemon flavored honey, sprinkle with roasted walnuts or have a good quality chocolate sauce ready for dipping.

Once you have mastered the art of choosing your vegetables and fruits, the possibilities for preparing them in healthy and fresh meals are endless. So, next time you ask yourself what’s for dinner? Remember your local farm markets, the goodness of the products of their land and bring them to your table. Why not start right now trying this delicious and healthy Italian recipe? Let’s cook!

 Recipe:

Conchiglie pasta with hearty pomodoro sauce

Serves 4-5

Ingredients:

500 g Conchiglie Italian pasta (shells)

2 onions, finely chopped

2 cloves garlic, crushed

1 carrot, finely chopped

1 celery stick, finely chopped

1 cup mushrooms, finely chopped

1 sweet red bell pepper, finely chopped

1 sweet green bell pepper, finely chopped

1 small eggplant, diced in cubes

1 cup broccoli florets

1 cup very ripe tomatoes, finely chopped

1/3- cup sun dried tomatoes, cut in halves

3 cups fresh tomato sauce (you can replace it by a good quality store bought tomato sauce)

½ cup of Spanish olives (pitted)

Fresh basil leaves, to taste

Fresh Italian oregano, to taste

Salt and fresh ground pepper to taste

Pinch of sugar

Freshly grated Pecorino or Parmesan cheese, for serving

Good quality Italian olive oil

Procedure:

1. – Heat the oil in a heavy-based pan. Add the onion, garlic, carrot and celery. Cook the vegetables in medium heat stirring occasionally.

2. – Add the bell peppers, eggplant, mushrooms, and broccoli florets and diced tomatoes. Keep on eye on your vegetables by stirring occasionally.

3. – As they start to cook add the tomato sauce and sun dried tomatoes. Lower the heat, cover the pan and cook until soft but not mushy. Add the Spanish olives; season the sauce with salt, pepper, fresh herbs and a pinch of sugar (to reduce any acidity from the tomatoes).

4. – Bring a large pot with cold water to boil. Before adding the pasta shells, season it with salt and add a few drops of olive oil to prevent pasta from sticking. Once your water reaches the boiling point, add the pasta and cook until al dente.

5. – Drain the pasta and transfer it quickly to the pan with the hearty pomodoro sauce. Gently toss until combined. Serve immediately in large bowls or dinner plates. Drizzle with Italian olive oil and freshly grated Parmesan or Pecorino cheese. Add few fresh basil leaves on top. Bring to your table, enjoy and Buon Apetito!